Hi..hi good morning all. This time i will to share about blogged.com, why? because this social network can increase traffic your blog or website. OK, no more talk. Just let begin and follow my step.
1. Log in to your account Facebook
2. Search blogged application on search box, see picture below.

3. Choose blogged button.

4. Choose go to apps or add to my page button

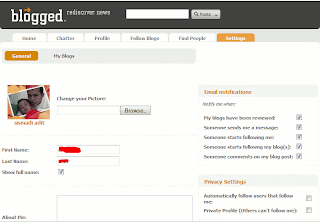
5. Look the result, like picture below.

6. Choose setting and merge your facebook and blogged account.

7. Fill email and password of blogged account.

8. After log in, refresh your browser and see the result.

Now log in to your blogged.com account to setting and submit your blog or website.
OK, already done. Still confuse, just leave your comments and i will give you respond ASAP.
Best regard,

How to use blogged on your FaceBook(increase traffic your blog)
Posted by Sismadi SSM | 8:02 AM | blog tutorial, tips and trick | 2 comments »Install related post widget with thumbnails for blogger
Posted by Sismadi SSM | 12:46 AM | blog tutorial | 13 comments » Hi guys, good morning... How do you do? I hope today is great day for all of you. Today i will share about related post, it's not fresh for senior blogger but i think for newbie alike me very useful to give more information for visitors. This blog i dedicated to blogger newbie and my students want to create blog.
OK guys no more talk, just go action. Follow my step by step tutorial.
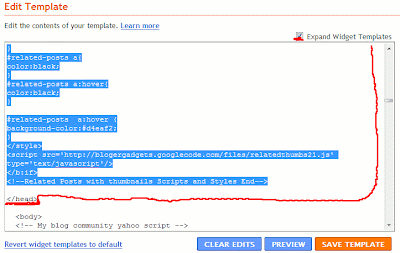
1. Log in to blogger.com and from dashboard choose "Layout" tab --> "Edit HTML" than checked the "Expand Widget Templates" check box, don't forget to backup your template first(to prevent if your installation failure you can restore it again)
2. Search tag below</head>
Paste this code above tag :
<b:if cond='data:blog.pageType == "item"'>
<style type="text/css">
#related-posts {
float:center;
text-transform:none;
height:100%;
min-height:100%;
padding-top:5px;
padding-left:5px;
}
#related-posts h2{
font-size: 1.6em;
font-weight: bold;
color: black;
font-family: Georgia, “Times New Roman”, Times, serif;
margin-bottom: 0.75em;
margin-top: 0em;
padding-top: 0em;
}
#related-posts a{
color:black;
}
#related-posts a:hover{
color:black;
}
#related-posts a:hover {
background-color:#d4eaf2;
}
</style>
<script src='http://blogergadgets.googlecode.com/files/relatedthumbs21.js' type='text/javascript'/>
</b:if>
3. Search tag below<div class='post-footer-line post-footer-line-1'>
If you can not find it then try finding this one<p class='post-footer-line post-footer-line-1'>
Still can not find it then try this one again, like my template not standard so i must search with another word and i found post-footer-line-3 with title line-3<p class='post-footer-line' post-footer-line-3>
Paste this code after code above
<b:if cond='data:blog.pageType == "item"'>
<div id='related-posts'>
<b:loop values='data:post.labels' var='label'>
<b:if cond='data:label.isLast != "true"'>
</b:if>
<b:if cond='data:blog.pageType == "item"'>
<script expr:src='"/feeds/posts/default/-/" + data:label.name + "?alt=json-in-script&callback=related_results_labels_thumbs&max-results=6"' type='text/javascript'/></b:if></b:loop><a href='http://www.bloggerplugins.org/2009/08/related-posts-thumbnails-blogger-widget.html' style='display:none;'>Related Posts with thumbnails for blogger</a><a href='http://www.bloggerplugins.org/' style='display:none;'>blogger widgets</a>
<script type='text/javascript'>
var currentposturl="<data:post.url/>";
var maxresults=5;
var relatedpoststitle="Related Posts";
removeRelatedDuplicates_thumbs();
printRelatedLabels_thumbs();
</script>
</div><div style='clear:both'/>
</b:if>
4.You can adjust the maximum number of related posts being displayed by editing this line in the code below. For example you want to display 7 title of related postsvar maxresults=7;
5.To edit the title of the widget you can change this line of codevar relatedpoststitle="Related Posts"; 
To change the colors and all you will have to modify the CSS
If you have troubles implementing this, just leave me a comment here and i will help you ASAP. If you like to give me any suggestions on how to improve this widget,then it would be really great.
Best regard,
Inspiration posting How to install related posts widgets with thumbnails view


This post may be not new but for new blogger will be helping. What are useful tag cloud? Tags or tag cloud
OK, lets starting...follow me.
1. Go to Layout>Edit HTML in your Blogger dashboard, and search for the following line (or similar):
| <b:section class='sidebar' id='sidebar' preferred='yes'> |
2. Copy and paste the code after it, Or if you have many labels on page accordingly you wanna be place the code.
| <b:widget id='Label99' locked='false' title='Labels' type='Label'> <b:includable id='main'> <b:if cond='data:title'> <h2><data:title/></h2> </b:if> <div class='widget-content'> <script src='http://halotemplates.s3.amazonaws.com/wp-cumulus-example/swfobject.js' type='text/javascript'/> <div id='flashcontent'>Blogumulus by <a href='http://www.roytanck.com/'>Roy Tanck</a> and <a href='http://www.bloggerbuster.com'>Amanda Fazani</a></div> <script type='text/javascript'> var so = new SWFObject("http://halotemplates.s3.amazonaws.com/wp-cumulus-example/tagcloud.swf", "tagcloud", "240", "300", "7", "#ffffff"); // uncomment next line to enable transparency //so.addParam("wmode", "transparent"); so.addVariable("tcolor", "0x333333"); so.addVariable("mode", "tags"); so.addVariable("distr", "true"); so.addVariable("tspeed", "100"); so.addVariable("tagcloud", "<tags><b:loop values='data:labels' var='label'><a expr:href='data:label.url' style='12'><data:label.name/></a></b:loop></tags>"); so.addParam("allowScriptAccess", "always"); so.write("flashcontent"); </script> <b:include name='quickedit'/> </div> </b:includable> </b:widget> |
For modification appearance, you should do this:
| var so = new SWFObject("http://halotemplates.s3.amazonaws.com/wp-cumulus-example/tagcloud.swf", "tagcloud", "240", "300", "7", "#ffffff"); |
*Number 300 with blue color to set height.
*Number #fffff with green color to set background color.
To set text color find this code and replace with your favorite color
| so.addVariable("tcolor", "0x333333"); |
To set font size, find this code and replace the red color number:
| so.addVariable("tagcloud", "<tags><b:loop values='data:labels' var='label'><a expr:href='data:label.url' style='12'><data:label.name/></a></b:loop></tags>"); |
OK, it's finish and don't forget leave comments after read it. I'll be back soon with more tips.
Original posting All About Computer
Best regard,

Hi guys, how do you do? I hope all of you wealth and OK. This time i will guide you "How to Create Read more on Blogspot.com", this article specially for beginner blogging.
OK, no more talk... lets start to do. Here steps you must followed:
1. Adding the Conditional CSS
What should i do? This way, the first step Log in to blogger.com and in the dasboard menu just Click Layout ---> Edit HTML. And than don't forget to make a backup Download Full Template. This is necessary if you fail to do, we can upload the original template. Find this code </head> and adding code to above exactly:
<style>
<b:if cond='data:blog.pageType == "item"'>
span.fullpost {display:inline;}
<b:else/>
span.fullpost {display:none;}
</b:if>
</style>
It makes a class called fullpost will appearance in detail page you were post.
2. Adding Read more code
The second step, add link Read More (what ever you called will be showed on detail posting after prolog). Just click checkbox Expand Widgets Templates above editing box templates.
Founded this code:
<data:post.body/>
Add this code below:
<b:if cond='data:blog.pageType == "item"'>
<style>.fullpost{display:inline;}</style>
<p><data:post.body/></p>
<b:else/>
<style>.fullpost{display:none;}</style>
<p><data:post.body/>
<a expr:href='data:post.url'><strong>Read more...</strong></a></p>
</b:if>
If finished, click Save Now button below(ussualy blue color button). Read more will be show in main page, if clicked will show detail posting article.
3. Adding on Setting Format
Finally step is setting format, click setting on tab bar and chosse fomatting. Go to the end page(below) andthen add this code on the box with name Post Template.
<span class="fullpost">
</span>
Don't forget to click Save Setting button(orange button color).
The result is

Ok it's finish, when you are posting article make sure the text preffix place in above <span class="fullpost"> and the rest place below <span class="fullpost">.
I hope usefull for you, don't forget to leave comments.
Original posting All About Computer
Best regards,

After create blog and setting template, now time to share your knowledge. Everybody have idea and the idea can poured of to blog. This time i guide you to post article for the first time blogging.
Lets do it.
1.log in to your blog.
2.On dashboard menu choose Tab "New Post".
3.Fill the title and poured of your idea.
4.Click button "save now" and "publish post".
5.See the result.
OK, it's finish first time post article, right now all of you capable to post your article.
Leave comment even-thought it very short article, i dedicated for blogger newbie.
i hope useful and be success.

Change your template from the classic one
Posted by Sismadi SSM | 11:14 AM | blog tutorial | 0 comments »The second tutorial, i will guide you how to change your template from the classic one. Before you change it, you should browse template first and make a decision what kind template relevant with your blog.
OK, no waste time lets do it.
1.log in to your blog
2.On dashboard menu choose "Layout-->Edit HTML"
3.Don't forget to backup your template first(download full template)
4.Click “browser button” your template after you download and extracted file
5.Click “upload button” and save template.
6.Setting template finish, and than set your appearance(add widget/modify) with choose tab “page element”.
OK, the next article i gave title “the first time posting article”.
Don't forget to leave your comment, thanks very much.
Best regards,

Hi guys, for the first article in "let go blogs" i will guide you aspecially for my students has not have blog(is a personal online journal that is frequently updated and intended for general public consumption). I post this article because many of them, not yet knowledge about blog.
OK, lets begin tutorial.
1. Go to this url blogger.com.
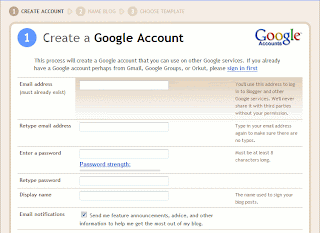
2. Choose “create a blog” and create google account.
3. Fill form to create google account( you must be have email account in google first)
4. Fill title and name of blog than choose continue.
5. Choose template as you like, later all of you allowed to change template after blog created.
6. Create blog is finish.
Congratulation, you have a new blog now.
After read, alike usually leave your comment here
Best regard,


