 Hi bro and sis, today i'll to share about PTC(pay to click). This time i review neobux. Neobux one of many PTC online. And than what is neobux? NeoBux is a free worldwide service available in both English and Portuguese language.
The service consists of allowing advertisers to reach thousands of potential customers by displaying their advertisement in the site and users to earn money by viewing those advertisements.
Users click on the advertiser's advertisement and view it during the amount of time specified by the advertiser. After viewing the ad, the user gets credited with a pre-determined amount of cash on their NeoBux account.
You don't need to pay us to start earning. So, register now and start earning money for free!
HOW MUCH CAN I EARN?
You will get earn estimate like this, the amount of money each user earns varies between the user's membership, the advertisement viewed, the number of referrals the user has and the number of advertisements those referrals view.
This screenshot of your earning per day, with assumption the users click 1 ads.

The users click 2 ads

HOW MUCH DO I GET PAID AND WHEN?
The amount we pay you is divided between several factors.
First let's describe the amount you win per click and for each of your referral's clicks depending on the type of membership you have:
Standard Membership
Per click:
$0.010 (standard exposure) · $0.015 (extended exposure)
Per referral click:
$0.005 (standard exposure) · $0.010 (extended exposure)
Golden Membership
Per click:
$0.010 (standard exposure) · $0.020 (extended exposure)
Per referral click:
$0.010 (standard exposure) · $0.020 (extended exposure)
We also have mini exposure advertisements where users earn $0.005 for each click without referral commissions.
Minimum Payout:
The first time $2, second $4 and third $10. After the third you can request payout if your earning more than $10.
After 15 days, you can buy referral with your own earning. Payment pass through paypal. So what you waiting for? Let join and build your network to get the bigger earning. It's just need 5 minutes online everyday to click ads.
Don't forget to leave your comment and join it.
*Notice : If you join without referral, your referral will be renting to another user by neobux.
Best regards,

Get new resource earning pass through neobux(PTC)
Posted by Sismadi SSM | 2:27 AM | Earn Money, PTC | 3 comments »How to use blogged on your FaceBook(increase traffic your blog)
Posted by Sismadi SSM | 8:02 AM | blog tutorial, tips and trick | 2 comments »Hi..hi good morning all. This time i will to share about blogged.com, why? because this social network can increase traffic your blog or website. OK, no more talk. Just let begin and follow my step.
1. Log in to your account Facebook
2. Search blogged application on search box, see picture below.

3. Choose blogged button.

4. Choose go to apps or add to my page button

5. Look the result, like picture below.

6. Choose setting and merge your facebook and blogged account.

7. Fill email and password of blogged account.

8. After log in, refresh your browser and see the result.
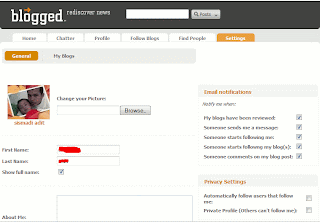
Now log in to your blogged.com account to setting and submit your blog or website.
OK, already done. Still confuse, just leave your comments and i will give you respond ASAP.
Best regard,

How to change favicon in blogger blog
Posted by Sismadi SSM | 10:59 PM | Accessories, tips and trick | 2 comments »![]() Favicon? I never heard it
Favicon? I never heard it
A favicon is a small 16X16 image located at the top of your browser in the url bar.
It can be your blog logotype or some funny small picture, for example my logo you can see above.
OK, just take your logotype (if you have it), alike mine.
Creating Favicon
After you create your logo, than change size to 16x16 pixel. You can re-size your image on this Favicon Generator, save your logo in '.ico' format ( for example: letgoblogs_favicon.ico ). Upload the icon on your domain(if you have it) or here(ImageShack, photobucket, pages.google.com), and copy the link.
Installing Favicon
1. Log in to your blogger account.
2. Click on 'Layout'.
3. Click on 'Edit HTML', don't forget to backup your template first.
4. Find tag '</head>' and place this link below.<link href='http://sismadi.vndv.com/img/letgoblogs_favicon.ico' rel='shortcut icon'/>
<link href='http://sismadi.vndv.com/img/letgoblogs_favicon.ico' rel='icon'/>![]()
*Change the italic font(http://sismadi.vndv.com/img/letgoblogs_favicon.ico) to your account address, change 'letgoblogs_favicon.ico' to your favicon name.
5. Now save your template.
6. Once your template is saved view your blog and make sure to refresh the page and delete your cookies.
It finish, don't forget to leave your comment...cheers.
Best regards,

A little tips to release banned from shoutmix
Posted by Sismadi SSM | 11:16 PM | tips and trick | 12 comments » A couple days i was banned by shoutmix.com, i think too many sent with the same message when i'm blogging...You knows if we must send with different messages every shoutmix widget on blog or website is too tired, so i do to copy and paste message to shoutmix widget on another blog or website.
But don't worry, i give you tips. Today i was released from shoutmix banned. This is a little tips must to do if you got banned.
A few reason shoutmix banned:
1. Banned from user administrator(Owner blog or website)
* User admin can banned special visitors to do spamming

The Solution, Just send email to owner blog or website was banned you to release your IP or Url.
2. Banned from shoutmix administrator
* We do blogging overload message sent an hour,usually 600 hundred message
* We are usually use the same messages to leave message on shoutmix widget
* We are usually sent html code to shoutmix widget
The Solution:
1.Log in to shoutmix.com
2.Choose tab help
3.click tab ban
4.Click contact us accordingly type of banned you got
And below i did it to release my blog from shoutmix banned.
1. The first step, log in as Administrator.
2. Fill password to log in.
3. If you see ban deleted, it is mean that your blog has release.
OK, for any body get banned by shoutmix just patient wait confirm from administrator.
A like usual after read it,just leave message.
Best regards,

How to insert counter of visitors into your blogspot
Posted by Sismadi SSM | 1:28 AM | Accessories, tips and trick | 5 comments »Hello guys, time to share again. For couple days there is visitor to my blog and she has a question about Hit counter. We all knows Hit counter is one of parameter for blog or website success. Blog or website without visitors is useless so Hit counter is important to install into your blog or website right.
This tutorial i dedicated special for newbie or someone didn't familiar with HTML, XML, Scripting or template. I used histats because very informative such as how many today visited, how many user online in the same time/simultaneous and how many visitors came to blog or site until today.
OK, i do not waste time...let's begin. Follow me step by step.
1. Go to histats.com and fill url, choose language and than click Register button.

2. Fill all data about your blog or site on form and than click Continue button.

3. Choose Category of histats appearance

4. Choose type 1 of them models, see picture below. I was select for counters 4 line because very informative.

5. Modify text to show if you want it, if not just leave and click Continue button

6. Wait for moment then code of HTML/XHTML will be displayed

7. Copy the code and embedded into your blog. To embedded you must log in into your blog, my platform blog is blogspot, so i log in to blogger.com.
Choose dashboard --> layout --> add a gadget and than paste the code you had copied. Don't forget click Save button to save your gadget. See the picture below.

8. One more click Save button to save into your blog.

9. The last step, see the result like this.

This is another link provide widget hit counter statcounter.com, basicstat.com, digits.com and 24counter.com.
OK, it's so simple right. I hope useful for newbie blogger. If histats not yet appear do not panic, try open your blog or site with another browser and wait for moment. If there is something not yet clear just leave comment and i will try to explain asap, if you satisfy leave comment too.
Best regards,

How to setup shoutbox into your blogspot
Posted by Sismadi SSM | 2:23 AM | Accessories | 8 comments »Hello, good morning all. Today i share about how to setup shoutbox
This article just for newbie in blogging world... So not many talk, JUST DO IT.
1.Go to this url shoutbox, i preferred this site cause shoutmix have a good memory buffer, so we do not need fill name and website form on it.
2.Fill data on shoutbox and contact information, for detail see the picture below.
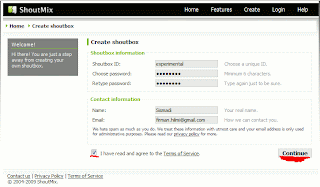
3.Click continue and go to control panel to get code
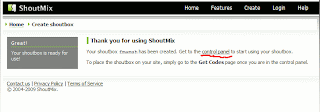
4.Setting your appearance shoutbox if necessary and click getcode
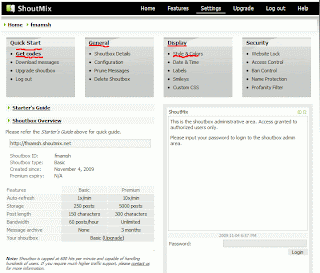
5.Copy code such as picture below
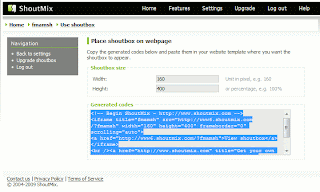
6.And than go to blogger.com and log in to your account
7.On the dashboard view choose layout tab
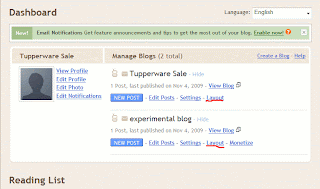
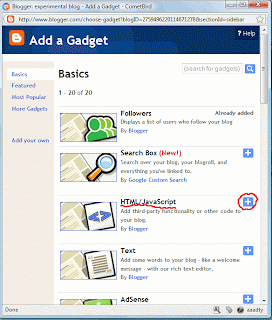
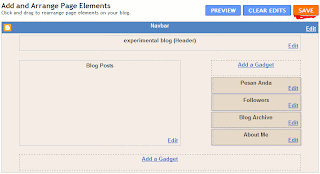
8.Add gadget/widget(choose HTML/JavaScript) and paste the code you had been copied.
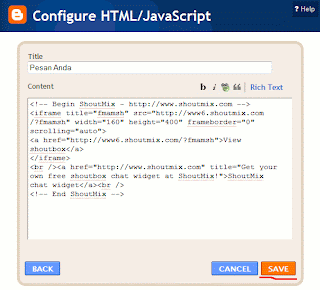
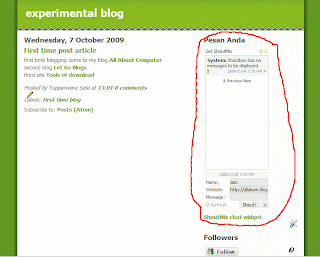
9.And than save and do not forget to save on your dashboard setting than view blog to see the result.
10.OK, it's so simple right.
Do not forget to leave comment after read it, i hope this tutorial useful for newbie into blogging world.
Best regards,

Install related post widget with thumbnails for blogger
Posted by Sismadi SSM | 12:46 AM | blog tutorial | 13 comments » Hi guys, good morning... How do you do? I hope today is great day for all of you. Today i will share about related post, it's not fresh for senior blogger but i think for newbie alike me very useful to give more information for visitors. This blog i dedicated to blogger newbie and my students want to create blog.
OK guys no more talk, just go action. Follow my step by step tutorial.
1. Log in to blogger.com and from dashboard choose "Layout" tab --> "Edit HTML" than checked the "Expand Widget Templates" check box, don't forget to backup your template first(to prevent if your installation failure you can restore it again)
2. Search tag below</head>
Paste this code above tag :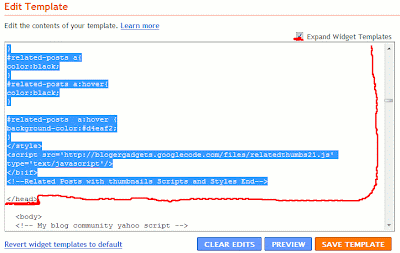
<b:if cond='data:blog.pageType == "item"'>
<style type="text/css">
#related-posts {
float:center;
text-transform:none;
height:100%;
min-height:100%;
padding-top:5px;
padding-left:5px;
}
#related-posts h2{
font-size: 1.6em;
font-weight: bold;
color: black;
font-family: Georgia, “Times New Roman”, Times, serif;
margin-bottom: 0.75em;
margin-top: 0em;
padding-top: 0em;
}
#related-posts a{
color:black;
}
#related-posts a:hover{
color:black;
}
#related-posts a:hover {
background-color:#d4eaf2;
}
</style>
<script src='http://blogergadgets.googlecode.com/files/relatedthumbs21.js' type='text/javascript'/>
</b:if>
3. Search tag below<div class='post-footer-line post-footer-line-1'>
If you can not find it then try finding this one<p class='post-footer-line post-footer-line-1'>
Still can not find it then try this one again, like my template not standard so i must search with another word and i found post-footer-line-3 with title line-3<p class='post-footer-line' post-footer-line-3>
Paste this code after code above
<b:if cond='data:blog.pageType == "item"'>
<div id='related-posts'>
<b:loop values='data:post.labels' var='label'>
<b:if cond='data:label.isLast != "true"'>
</b:if>
<b:if cond='data:blog.pageType == "item"'>
<script expr:src='"/feeds/posts/default/-/" + data:label.name + "?alt=json-in-script&callback=related_results_labels_thumbs&max-results=6"' type='text/javascript'/></b:if></b:loop><a href='http://www.bloggerplugins.org/2009/08/related-posts-thumbnails-blogger-widget.html' style='display:none;'>Related Posts with thumbnails for blogger</a><a href='http://www.bloggerplugins.org/' style='display:none;'>blogger widgets</a>
<script type='text/javascript'>
var currentposturl="<data:post.url/>";
var maxresults=5;
var relatedpoststitle="Related Posts";
removeRelatedDuplicates_thumbs();
printRelatedLabels_thumbs();
</script>
</div><div style='clear:both'/>
</b:if>
4.You can adjust the maximum number of related posts being displayed by editing this line in the code below. For example you want to display 7 title of related postsvar maxresults=7;
5.To edit the title of the widget you can change this line of codevar relatedpoststitle="Related Posts"; 
To change the colors and all you will have to modify the CSS
If you have troubles implementing this, just leave me a comment here and i will help you ASAP. If you like to give me any suggestions on how to improve this widget,then it would be really great.
Best regard,
Inspiration posting How to install related posts widgets with thumbnails view

How to Install Music into your blog
Posted by Sismadi SSM | 7:46 PM | Accessories, tips and trick | 10 comments »
OK, Guys this time i will to share about install music into your blog. It's necessary to make visitors comfortable and relax while reading article. OK, Let begin and follow my steps.
1. Goto http://www.mixpod.com and search your favorite artist tobe add to your playlist.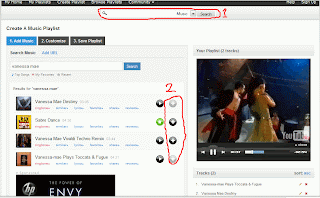
2. Customize, on this option you can choose skin, color and setting(autoplay, shuffle, volume ect)
3. Save and get code
4. Choose platform your blog(i choose blogspot cause i created my blog on blogspot), copy code and install into your blog with guidance appear on that page.
OK, time to share your favorites music with your visitors. Enjoy it and relax.
Thanks for attention and leave your comment below.
Best regards,

Tips for disable Javascript(enable copy article from site)
Posted by Sismadi SSM | 1:04 AM | tips and trick | 4 comments »Hi guys, this time i will share my experience when i want to copy article from another site. When i press right click button of mouse, option copy disable(cannot copied) and then i remember about javascript. So i try to explore browser option, the end i was found it.
Here the step to disable javascript.
1. Choose "Tools" option on your browser(Firefox, Cometbird i use it).
2. Click "options".
3. Click "content".
4. Unchecked "Enable Javascript".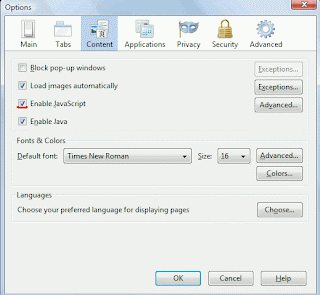
Screen Snapshot of cometbird
OK it's finish a little tips for my visitors.
Please leave comment after read it, i hope useful for you.
Best regards,

Increase your traffic with networkedblogs on Facebook
Posted by Sismadi SSM | 10:06 PM | tips and trick | 9 comments »Hi guys, this time i will share how to install networkedblogs on your facebook account. This tool can be increase your blog traffic of visitors. Right now the member of networkedblogs almost 400.000 users, this is very potential to increase visitors come to your blog.
I will guide you step by step. Follow this step.
1. log in to your facebook and search “networkedblogs” or visit this link networkedblogs
2. Click “networkedblogs" icon
3. Become fan of networkedblogs(jadi penggemar)
4. Click tab wall and click “go to application” button
5. Choose “allow" button
6. Select 5 blogs to follow or more and you could choose related with your blog to follow(choose category at the bottom of page)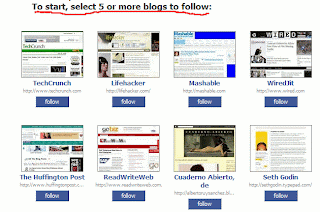
7. When all done the sixth step, click “next” button at the bottom of page.
8. This optional to follow, click this link to the next step
9. Now add your blog(add new blog)
10. Fill the data of your blog and click “next” button
11. OK finish until here.
OK guys time to rest this night. Don't forget to leave your comment, thanks a lot.
Original posting All About Computer
Best regards,


